
Is your computer running slow? Thinking about upgrading your RAM to boost performance? Before you buy new memory, the most crucial step is to understand the type of RAM currently in your computer. DDR, DDR2, DDR3, DDR4, DDR5 – these generations are incompatible with each other. Mixing or incorrectly installing them can range from a non-booting system to permanent hardware damage.
So, how exactly do you determine which DDR type your computer's RAM is? Don't worry, this article will guide you through several simple and effective methods to figure it out with ease!
1) Method One: Software Check (Recommended! Easy, Accurate, Safe)
For most users, using specialized software is the most convenient, safest, and recommended way to identify your RAM type.
1.1) Using CPU-Z (Highly Recommended)
CPU-Z is a free and powerful hardware detection tool that provides detailed information about your CPU, motherboard, RAM, and more.
Steps:
- Download and Install CPU-Z: Visit the CPUID official website to download and install the latest version of CPU-Z.
- Run CPU-Z: Double-click the desktop icon or find it in your Start Menu and run CPU-Z.
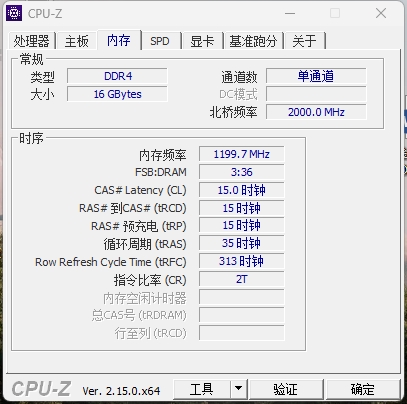
- Go to the "Memory" Tab: In the CPU-Z window, click on the "Memory" tab at the top.
Check the "Type" Field: Under the "Memory" tab, you will clearly see a field labeled "Type". This will explicitly show your RAM type, such as DDR3, DDR4, or DDR5. You'll also see other information like total RAM size and DRAM Frequency.
Pro Tip: The "SPD" (Serial Presence Detect) tab in CPU-Z allows you to view detailed information for each individual RAM stick in each slot, including manufacturer, model number, serial number, max bandwidth, and timings. This is the most comprehensive place to determine individual RAM stick specifications (like the KHX2400C15D4/8G or KVR16N11S8/4 we analyzed previously).
2) Task Manager (Windows Systems)
For newer versions of Windows (like Windows 10 or 11), the Task Manager can also directly display RAM type information.
Steps:
- Open Task Manager: Press Ctrl + Shift + Esc or right-click on an empty area of the taskbar and select "Task Manager".
- Go to the "Performance" Tab: In the Task Manager window, click on the "Performance" tab.
- Select "Memory": In the left-hand list, click on "Memory".
- Check Information: Above or below the memory usage graph on the right, you will usually see "Speed" (e.g., 3200 MHz) and "Memory Type" (e.g., DDR4).
3) Command Prompt (CMD)
You can also query RAM information via the command line, though the results might require further interpretation.
Steps:
- Open Command Prompt (as Administrator): In the Windows search bar, type cmd, then right-click on "Command Prompt" and select "Run as administrator".
Enter Command: In the Command Prompt window, type the following command and press Enter: DOS
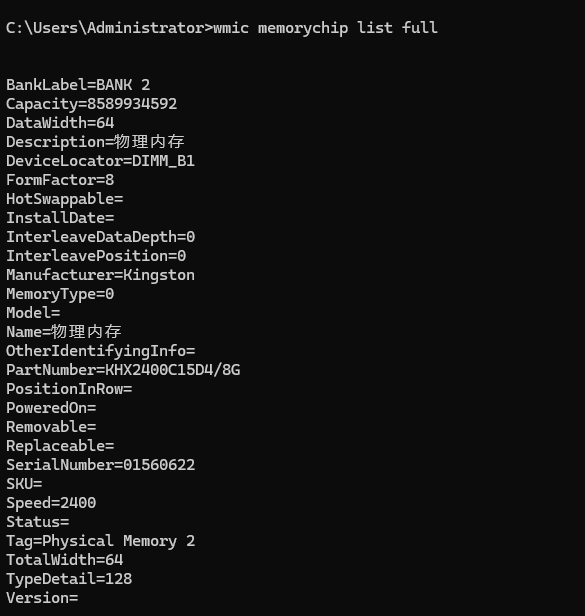
wmic memorychip list full
- Interpret Results:
- PartNumber: This is the most crucial field. For example, the D4 in KHX2400C15**D4**/8G explicitly indicates DDR4 memory. For older models, there might not be a direct "D" plus number, but you can infer the type by combining Speed and Voltage.
- MemoryType: This might return a numerical code (e.g., 24 typically for DDR3, 26 for DDR4). If it shows 0 (unknown), rely on the PartNumber or other fields.
- Speed: Shows the memory frequency (MHz).
- Capacity: Shows the memory capacity in bytes (you'll need to convert to GB).
4) Physical Inspection (For Tech-Savvy Users, Exercise Caution!)
If you're comfortable with hardware and can safely open your computer case, directly inspecting the RAM stick is another visual method.
⚠ Important Safety Note: Before opening your PC case and touching any internal components, always disconnect the power from your computer, unplug all power cables, and touch a metal part of the case to discharge any static electricity. This prevents electric shock or damage to sensitive electronic components.
4.1) 1. Check the Label on the RAM Stick
RAM sticks usually have a manufacturer's label with detailed model information, which includes the DDR type.
- Part Number: This is the most direct indicator.
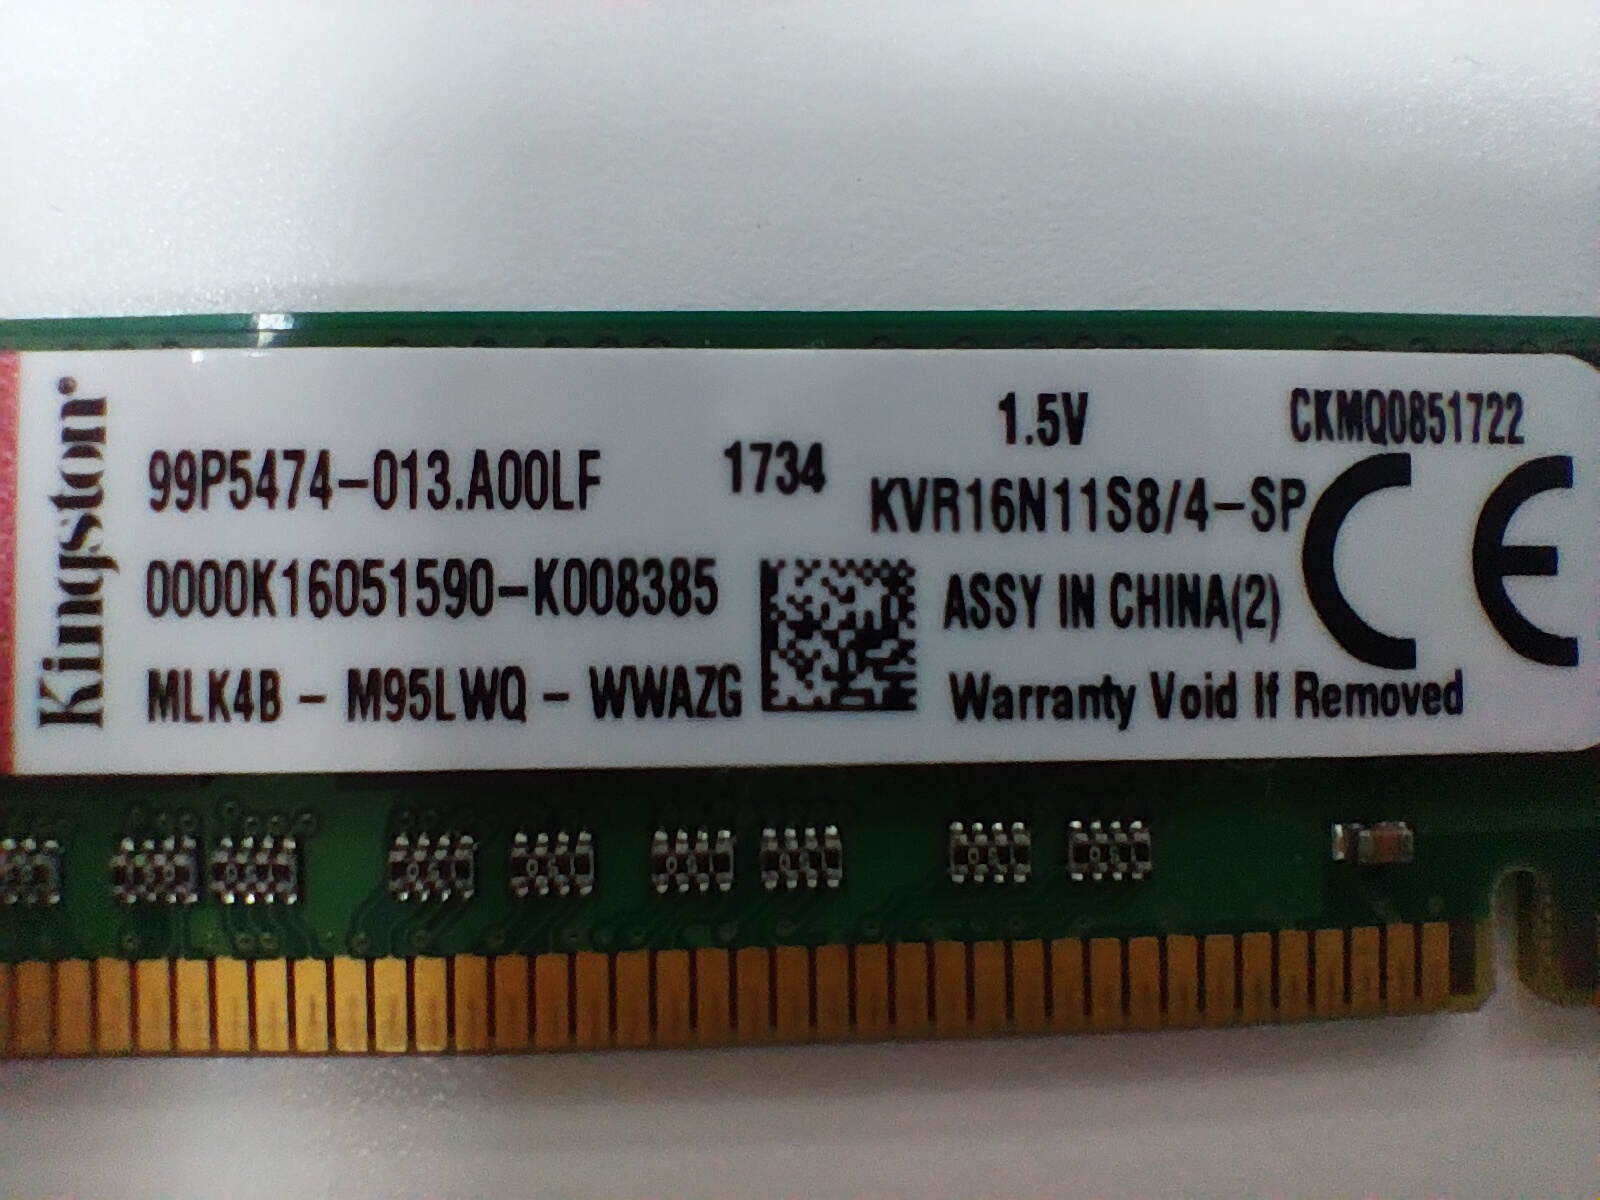
For DDR3: The model number may contain PC3 or D3 characters. Working voltage is typically 1.5V or 1.35V (low voltage).
For DDR4: The model number may contain PC4 or D4 characters. Working voltage is typically 1.2V.
For DDR5: The model number may contain PC5 or D5 characters. Working voltage is typically 1.1V.
Case Study:

- In our previous conversation, the D4 in the KHX2400C15**D4**/8G model clearly indicated DDR4. For the KVR16N11S8/4 model, even without an explicit D3, its 1.5V working voltage strongly suggested DDR3.
- Working Voltage: Voltage is a key indicator to differentiate DDR types.
- DDR3: 1.5V (Low voltage versions: 1.35V)
- DDR4: 1.2V
- DDR5: 1.1V
4.2) 2. Observe the Notch Position
This is the most straightforward and reliable physical identification method because the notch (key) position on the gold contacts (where the RAM connects to the motherboard) is different for each DDR generation.
- The notch positions for DDR1, DDR2, DDR3, DDR4, and DDR5 are all unique.
- Even though DDR4 and DDR5 share the same pin count (288 pins), their notch positions are different, preventing incorrect insertion.

Reference: You can search online for "DDR RAM notch comparison image" and compare your RAM stick's notch position with the pictures to quickly identify its type.
5) Understanding the Evolution of Different DDR Generations (Tech Corner)
Here's a summary of the main technological advancements across the DDR family, helping you better understand their differences
| Feature | DDR (DDR1) | DDR2 | DDR3 | DDR4 | DDR5 |
| Typical Freq (MT/s) | 200-400 | 400-1066 | 800-2133 | 2133-4800+ | 4800-8400+ |
| Prefetch Bits | 2-bit | 4-bit | 8-bit | 8-bit (with Bank Group) | 16-bit |
| Typical Voltage (V) | 2.5-2.6 | 1.8 | 1.5 (1.35 Low Voltage) | 1.2 | 1.1 |
| Desktop Pin Count | 184 | 240 | 240 | 288 | 288 |
| Notch Position | Unique | Unique | Unique | Unique | Unique |
| Max Single Module Capacity | Small | Small | Gradually Larger | Typically 32GB/module | Up to 128GB/module |
| Power Management | Motherboard-controlled | Motherboard-controlled | Motherboard-controlled | Motherboard-controlled | Integrated on Module (PMIC) |
| ECC (Error Correction) | None | None | None | Server RAM Support | On-die ECC |
6) Conclusion
Whether you choose to use software like CPU-Z for a quick and accurate check, or physically inspect your RAM stick's label information and notch position, identifying your RAM type is straightforward. Understanding this information is the crucial first step to correctly upgrading your computer's memory, ensuring compatibility with your motherboard and avoiding potential issues.
Now, go ahead and check your PC's RAM, and get ready for a performance boost!
Back to top
Comments